
A few days ago, during a spring cleaning session, I discovered an ESP32I bought for an old project (but never used), buried in a closet. I’m talking about a microcontroller device which is extremely cheap yet with a lot of great features, like a built-in Wi-Fi module.
Since I’m almost only using JavaScript in these days, I decided to install Espruino on it to be able to control it with a language that I already know and is familiar to me. So I immediately blew away the dust and tried to connect it to my Macbook but I found some issues on the first setup.
So I spent some hours on forums and Stack Overflow looking for a way to fix it, so now here you have the ultimate guide on how to install Espruino and JavaScript on an ESP32 with all the possible solutions on all the possible problems.
First, let’s start with a noob question:
What is an ESP32?
An ESP32 is a microcontroller with integrated Wi-FI and Bluetooth Low Energy. It’s basically a chip of the dimension of your thumb that you can use to access the Internet and call APIs or communicate with your phone.Pretty cool, right?
Here are some of the advantages for which I use/recommend the ESP32 microcontroller:
- create a DIY domotic house;
- read the temperature (with an external sensor) and humidity of your house every minute and send it to a server;
- build an air quality sensor;
- create an album cover visualiser connected with Spotify (this is really cool)
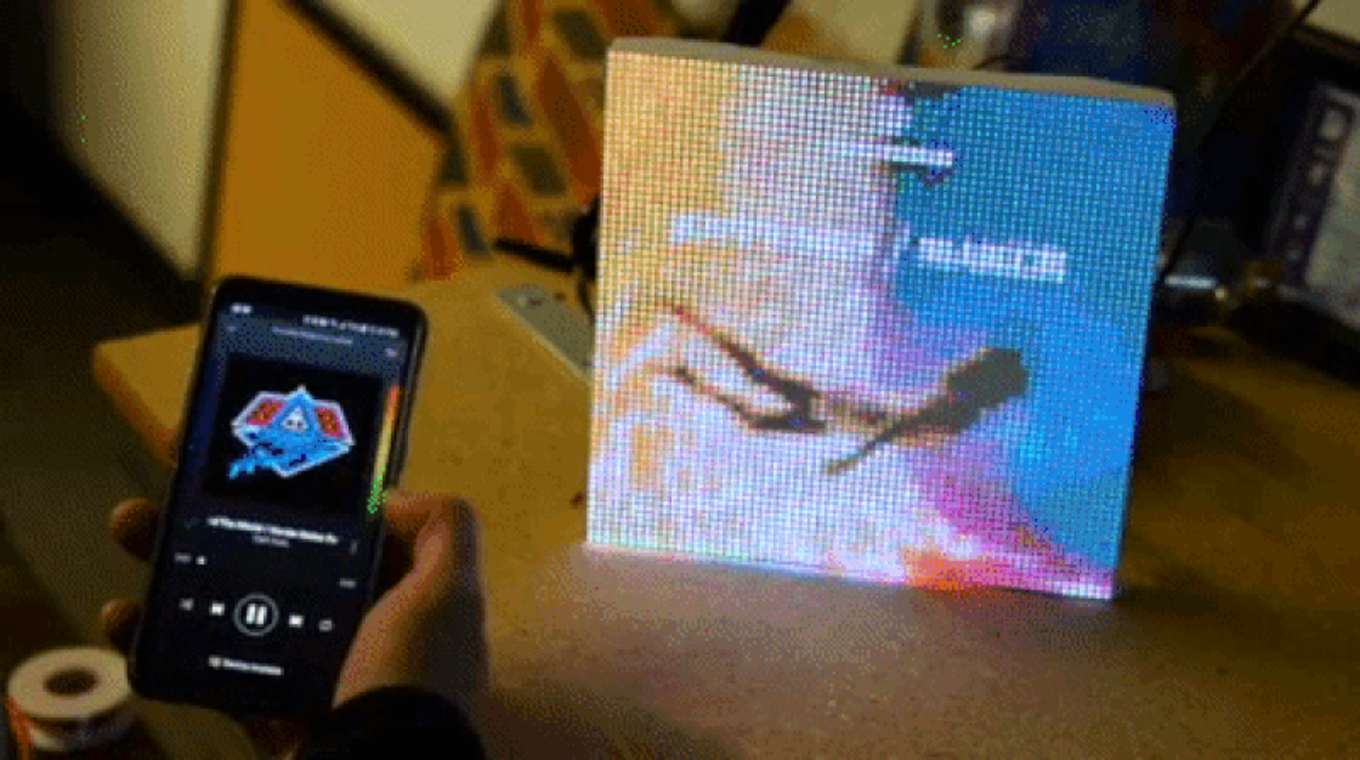
Spotify cover visualiser with ESP32
Also… it’s extremely cheap! You can find some single ESP32 at 3–4$ on Aliexpress or a bundle at 2$ each. If you want to have it in your hands tomorrow, you can also find them on Amazon Prime at ~10$ each; which is not that cheap compared to the others but is still less expensive than other IoT boards!
ESP32 it’s the direct successor of the ESP8266 (I wrote an article about it some years ago), and it carries a much powerful dual-core processor and more RAM. Moreover, it features some extra PINs and some useful built-in sensors.
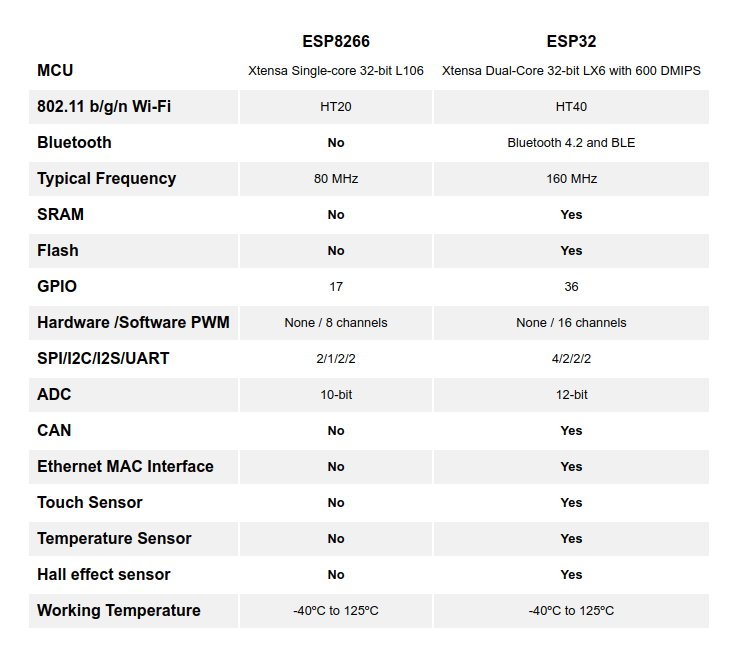
Comparison between ESP8266 and ESP32
You can do some really cool stuff with all this additional power, and the best part… you can also install JavaScript on it, with Espruino!
What is Espruino?
Espruino is an open source JavaScript interpreter for microcontrollers. It permits to use JavaScript within low-cost chips, meaning that you can start using it immediately even if you are not familiar with programming languages such as Arduino, Lua, etc..
Yes, after conquering the front-end world (JavaScript, React, Angular…) and the back-end world (with Node.js) you can also use JavaScript on the physical world with IoT devices and finally be able to use JavaScript everywhere, literally.
How to flash Espruino on an ESP32
Let’s start from a first setup: when you use an ESP32 for the first time it normally comes without code inside or with some Lua code to blink the internal led. Therefore we need to install Espruino in order to start doing our great JS stuffs. Such process is called Flashing, but don’t worry, exposing your genitals in public places isn’t necessary! Please, put back on your underwear, thank you.
First of all: let’s download Espruino!
Go to the download page of espruino.com and select the binary for ESP32, then click on the first link for the latest Espruino Version (v2.05 as of May 2020)
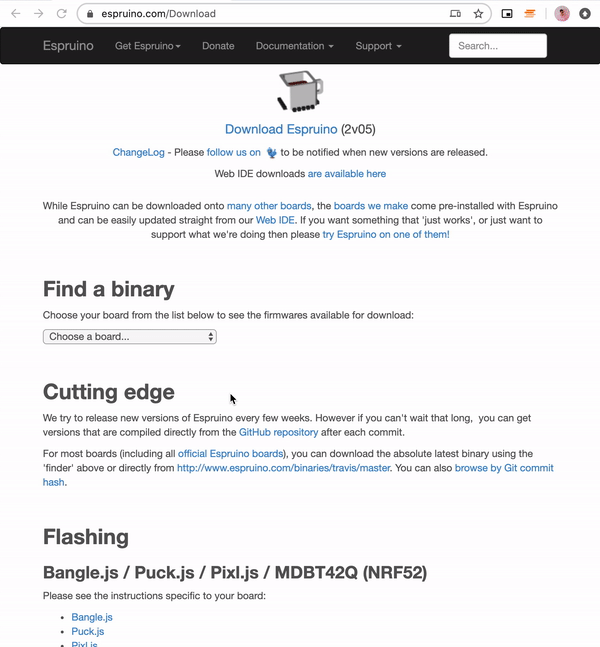
How to download Espruino binaries
Download all 3 files:
We will use them in a moment. First we need to be sure that our ESP32 is visible by our computer.
Find our ESP32
Let’s connect our ESP32 to a USB cable and to our computer. If it’s brand new, it should start blinking its LED, since that’s its default installed program (and also it’s a good way for us to make sure the device is not damaged).
Then, we need the location assigned by our PC to the ESP32 in order to address it when we are going to flash it. To obtain that, we need to install some drivers on our PC to let it successfully view the ESP32.
Install these drivers to be able to view the device from your PC/Mac (just find the right one for your operating system, download the executable and run it).
Based on your hardware of the ESP32, you may have to install only one of these drivers (I, for example, installed only the first one). Install them both just to be sure :)
https://www.silabs.com/products/development-tools/software/usb-to-uart-bridge-vcp-drivers
https://www.ftdichip.com/Drivers/VCP.htm
Installed? Good.
Now open your terminal and type (if you are on Linux)
ls /dev/tty*Or if you are on a Mac
ls /dev/cu.*For Windows users: go to the end of this guide, you will find a good guide on how to locate your ESP32 there!
If you see something like
/dev/tty.SLAB_USBtoUARTOr
/dev/cu.SLAB_USBtoUARTYou are ready to go! Remember this path, as it’s the location (port) where our ESP32 is located on our PC.
If you are on Mac and don’t see any device, it may be due to that fact that MacOS is preventing the drivers from loading. Open System Preferences -> Security & Privacy -> General and check if there is a message shown here about “System Software from developer …” where the developer name is Silicon Labs or FTDI and click on ‘Allow’ after entering your Admin password when asked.
Install Espruino
We will use esptoolto install Espruino. It’s written in Python, so be sure to have either Python 2.7 or >3.4 installed on your PC.
Then, using pip, run this command:
pip install esptoolIf this throws an error, try python -m pip install esptool or pip2 install esptool. This will install esptool in the executables directory and we will be able to run it from anywhere.
Do you still remember those 3 files we downloaded a few steps ago, and where did we put them? Great, now: go to that folder with your terminal and slightly edit this command in order to add our ESP32 location.
esptool.py                                          \
        --chip esp32                                \
        --port <INSERT HERE YOUR ESP32 LOCATION>    \
        --baud 921600                               \
        --after hard_reset write_flash              \
        -z                                          \
        --flash_mode dio                            \
        --flash_freq 40m                            \
        --flash_size detect                         \
        0x1000 bootloader.bin                       \
        0x8000 partitions_espruino.bin              \
        0x10000 espruino_esp32.bin
Just replace after — port the location found before. I replaced it with ---port /dev/cu.SLAB_USBtoUART .

Flashing Espruino on ESP32
And… Your ESP32 is now flashed with Espruino! 💪
Setup Espruino Web IDE

The easiest way to write (and execute) code on the ESP32 is by using Espruino Web IDE, a Chrome App which makes it possible to:
- Connect an ESP32 (or any other Espruino devices);
- write JS code and then execute it on your ESP32;
- open an interactive console, where you can debug your code or test some methods before flashing the code.
It’s available here:
https://chrome.google.com/webstore/detail/espruino-web-ide/bleoifhkdalbjfbobjackfdifdneehpo
First of all, we need to establish a connection with our Espruino. To do that, we have to change the default settings of Espruino Web IDE or we won’t be able to connect it in the right way. Believe me, I lost 4 hours on this.
Press the Settings Cog on the top-right angle, open the ‘Communications’ Tab and change the Baud Rate from 9600 to 115200. It will be saved automatically.
Ok, now close the settings and start working with your ESP32!
Press the ‘Plug’ yellow button on the top-left angle and select the Port that we found before (in my case: /dev/cu.SLAB_USBtoUART).

If it becomes green, then we are connected.
Let’s try with something simple: an Hello World (obviously).
As you can see, on the left side of the IDE, after we connected to the Espruino, there’s now a prompt. It’s the interactive console I announced before.
Let’s write console.log('Hello ESP32!'); and press Enter.

This code was executed on our ESP32, and it returned correctly. (console.log always returns undefined).
(Finally) let’s write some code!
For the next part we’re going to use all of Espruino’s potential just to… turn a LED light ON. (We are off to a good yet simple start, we must focus on the first steps, first. We’ll do something much cooler in the next articles, I promise! 🤞)
As we already saw some paragraphs ago, the ESP32 has an internal LED, and that LED is connected to the PIN n° 5. Here in Espruino the Pins are expressed with D1, D2, D3… ‘D’ as Digital Pin, so we can find the PIN n°5 in the variable D5. All Pins are already initialised by Espruino, so we don’t need to declare D5 before start using it.
We can use the Espruino method digitalWrite to write on the PIN D5 and change its state from OFF to ON. Just a note: to set a LED on, you must pass a 0 value. By default (LED off) the value is 1. I know it isn't the most intuitive thing in the world, but please keep it in mind as we are also going to use it in the future. Here is a good explanation about this.
Let’s try it! Just write digitalWrite(D5, 0) or digitalWrite(D5, false) in the console, and press Enter. You'll see the ESP32 internal LED is now on! 🥳
If you want to turn it off, just execute digitalWrite(D5, 1).
As by now, we gave our ESP32 simple one-line instructions that were executed immediately. What about some code that can be executed endlessly?
We are going to write some code to turn ON and OFF every 500 milliseconds our internal LED D5. The best part is… we are going to use all basic JavaScript instructions to do it, as we don’t need to learn any new command nor language.
Here is the code, copy/paste it in the right part (the white one) of Espruino Web IDE:
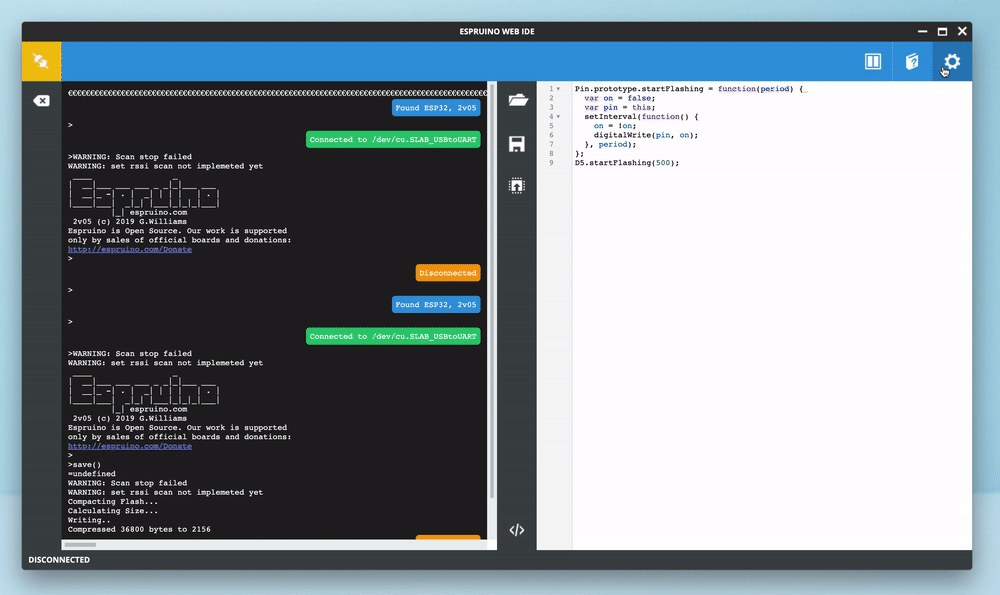
Pin.prototype.blink = function(period) {
  var on = false;
  var pin = this;
  setInterval(function() {
    on = !on;
    digitalWrite(pin, on);
  }, period);
};
D5.blink(500);
Looks familiar? That’s because it’s almost the same JavaScript code that you can run in your browser! That’s the beauty of Espruino: it’s just JavaScript 😉
We are going to extend the prototypeof the Pin object to add a new method, blink. This method has an internal variable to the current state of the PIN (on/off) and we are going to use setInterval to switch the state and digitalWrite it on the PIN.
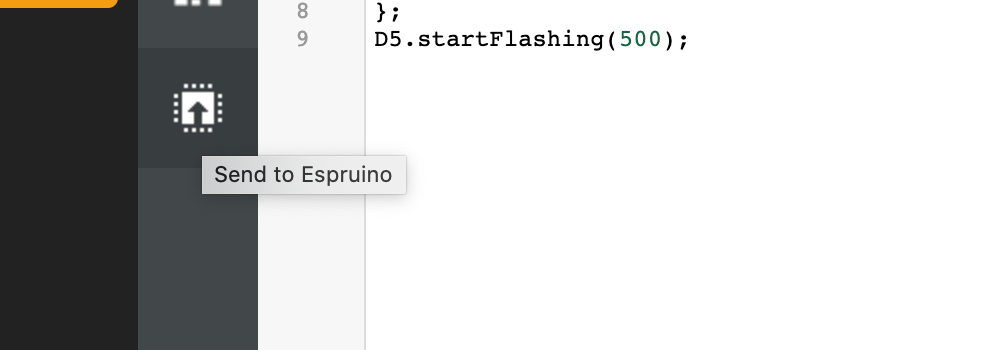
To load this code to our ESP32, we need to press the third button in the middle of the IDE: the “Send to Espruino” button.
After some seconds, you’ll notice the LED blinking. Nice!
Right now our code is in the memory of ESP32, but if you unplug it and then plug it again the USB cable it will lose all instructions and remain idle.
To permanently save our instructions, so that every time you turn on the device it will execute the code, you need to go to the console and type save(). That’s it, after a moment the code will be saved and now you can also plug it in a USB power adapter or to an USB external battery and it will work as expected.
What’s next
This article was an introduction on:
- What is Espruino and what is a ESP32 device;
- How to install Espruino and how to avoid all the first-setup headaches;
- How to use Espruino Web IDE and connect it to our ESP32;
- Run some basic code on it and save the code.
But there are lots of more pretty cool things that we can do with this cheap and small device and Javascript.
I will release a new article in the next weeks on how to connect our ESP32 to a WI-FI network, how to create an access point, and how to use it as a IoT node to send some data to an external service and view this data in a browser.
If you have any question, don’t hesitate to contact me on Twitter!
More Resources
- Espruino guide for ESP32: https://www.espruino.com/ESP32
- Extra info on the drivers and how to find your ESP32 serial connection (Windows users: this is your guide): https://docs.espressif.com/projects/esp-idf/en/latest/esp32/get-started/establish-serial-connection.html
- Espruino Methods Documentation: https://www.espruino.com/Reference#software